Preparing EAP Baselines
Once you have decided upon the EAP baselines to use, you must ensure these are in a four-column list (Student ID, Student Name, Subject, and Grade), saved in CSV (MS-DOS) format in Excel. You can run the file through the Sisra Analytics Excel Add-In to ensure the data is in the correct format, as shown below.
We also recommend using clear subject names to ensure your EAP baselines are treated separately to your official KS2 data. For example, you could use ‘KS2 Maths’ for your KS2 Maths Scaled Scores and ‘KS4 Target – Maths’ for your EAP Baseline. You should also split out subjects with different grade types using the subject name if necessary.
| For guidance on using the Excel Add-In to prepare data, please see the article linked here - Extracting and Preparing Grades or AtL Data (Admin). |
Uploading EAP Baselines
Once the file is prepared, upload your EAP Baselines by clicking DATA (A1) > key stage and cohort (A2) > KS2 / EAP (A3) > Uploads (A4) > ‘Upload Grades File’ (A5).
Next, select the file to upload, enter a clear file title (to help identify the contents of the upload) and click ‘Upload’ (A6).
|
"The file has been analysed and there are no valid grades to import. Please check the file for blank student IDs etc.” If you are presented with the above message, this is usually due to the file format being imported, as some newer versions of Office can default to CSV (Macintosh). To resolve this, click ‘Cancel the import’, resave your file with a different name and manually select CSV (MS DOS) in the ‘Save as type’ dropdown, then re-upload. |
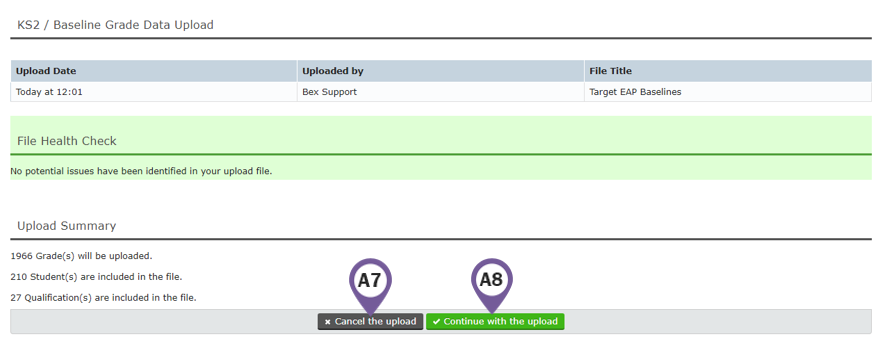
During the upload process, Analytics will perform a file health check, which will inform you of issues found in the file. We recommend checking this, as well as checking the number of students and qualifications listed in the upload summary are as you expect for this file.
If there are issues, then you can view further details by clicking ‘Show/Hide Warnings’. You can click ‘Cancel the upload’ (A7), address the issues and then re-upload the amended file. For more information on these potential issues, see here - EAP File Health Check Issues (Admin).
However, if you are happy with the file (or want to address issues in Analytics where possible) and you have checked the upload summary, click ‘Continue with the upload’ (A8).
 Confirm Upload Qualification Names
When uploading subsequent baseline grade files containing subject names that have not been uploaded previously for that cohort, the Confirm Upload Qualification Names page will prompt you to merge these with existing baseline subjects or create these as new subjects.
If the subject you’re uploading grades for has not been uploaded before for that cohort and is therefore new, select ‘New’ in the SISRA Qualification dropdown. (This is most common if you are uploading Target grades for the first time after having previously uploaded the official KS2 data).
However, if this subject exists for the cohort, but has been named slightly differently in the Baseline Management page compared to your file, you can merge these together by selecting the appropriate qualification from the SISRA Qualification dropdown.
Once you have completed the selections for all qualifications shown, click ‘Complete the upload’. Any new subjects will need to be set up in the Baseline Management section.
 Once completed, you will see your file has been uploaded and there are a number of options available to manage your file. Here you can export (A9) your grades list to Excel, edit the title or date of your file via the blue pencil icon, see a preview of the files contents via the eye icon, or permanently delete the file via the red x icon.
| Now that your baselines have been uploaded, the next step is to check Baseline Management to set these up. See the following guide for more info - KS3/4: Setting up EAP baselines (Admin). |
Thanks for reading!
